Invitees Grid
The Invitees Grid is where you can start importing your guest lists in the system so that an invitation email can be sent to them in order to attend your event.
The Invitees Module
Accessing the Invitees Module
To access the Invitees module:
1. Click on Invitees in the left-hand navigation:
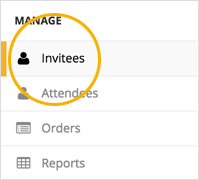
**Above image illustrates where to locate Invitees Module in the backend
Field | Description |
Invitees
| From this screen, you have the option to: Manually create an invitee. Import your invitees. Customise your invitees fields.
|
Invitee Flow
| The flow for using invitees in GEVME is as follows: Build your list of invitees by either:
Importing them from a file or by manually adding them in. Send them an invitation email with a CTA (Call-To-Action) button to register. Invitees who register by clicking on the CTA button in the email are then converted to attendees.
|
Unique Email in Invitees | It is recommended and very important to set the email address field to have unique values in the Invitees collection (by default it's already set this way) |
Importing Invitees in the system
If you don't have any invitee, you will see the following screen:

**Above image illustrates the backend view when there’s no imported Invitees in the system
If you already have invitees in the system, you will see then the invitees grid:
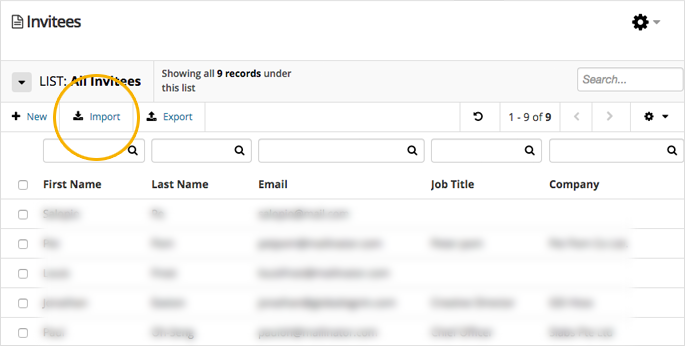
**Above image illustrates the backend view when there is already some imported Invitees in the system
Click on the Import button in any case.
This will open the Import Invitees wizard popup.

**Above image illustrates a guest list being imported from a file
Click on the Import from a file button, then click on the Next button.
Upload your file screen will be displayed

**Above image illustrates the settings before uploading your file
Field | Description |
File to import | Click the Choose file button to select your file. Alternatively, just drag your file into the No file selected box. |
Match records based on | This option allows you to choose which column to use to match your records between your import target (in this case Invitees) and your import source (in this case a file) during the import. The values under this option are the following:
(1) ID This is the GEVME default setting. The ID is a unique number, generated by the system when you export your records from the grid.
Note: The ID number is system generated and cannot be manually created.
(2) Email Any other fields with Unique values validated in your Invitees Form will also be listed in the dropdown. |
If duplicate records are detected | This option allows you to choose the action to take when matching records are found in the file and the system. The possible settings under this option are:
(1) Update with new information This option will update the information of the matching record in the target destination (if the information is different from the source).
(2) Skip This option will not update the information of the matching record in the target destination. |
Assign imported records to static list? | Choosing Yes for this option will add the imported records to a static list of your choice immediately after they are imported. |
Advanced options | (1) Character encoding
(2) Date and time format in your file Specify the date and time format that you are using in your file to make sure that the system reads them correctly during import. |
Upload file | Click on the Upload file button
 |
Match your columns & import your records

**Above image illustrates how to match your columns & import your guest list
This step allows you to match the columns in your file to their corresponding fields in your invitees form. By default, GEVME will smartly read the column headers in your file and do the matching, but you can of course override this decision and do the matching manually.
Fields | Description |
GEVME Invitee Fields / Column in your file | Fields for which GEVME cannot find a matching column from your file will be marked as "Will not be imported", for example, the Country field in the screenshot below: 
|
Will not be imported | To do the matching manually, simply select the column in your file from the dropdown for the corresponding invitee field. For e.g. if your country column was called Origin in your file, select it from the dropdown:
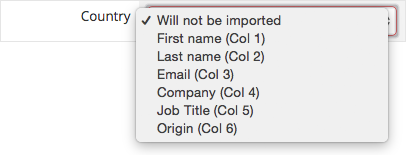
This will then match the Country field in your invitee form to the Origin column in your file: 
|
Import records | Once you are satisfied with the matching, click on the Import records button. 
|
Sending Invitation email to Invitees
You have to go to the Invitees grid, select the invitees you want to send the invitation email to (or load a list if you have created one).
Fields | Description |
“Email” button | On the Grid, you’re able to perform different actions like Import, Export and so on. In this example, we are sending an invitation email to the imported guests/ records:

|
Use a template | The Composer window gives you a preview of who you’re about to send your invitation email to and you have the ability to select your desired template e.g Invitation 
|
Creating a new record manually
Creating a new record comes in handy especially when you have one or two guests who need to be added in the system. In this case, you don’t need to import from a file.
Fields | Description |
“+New” button | Clicking on the “New” button will load the Invitee form. 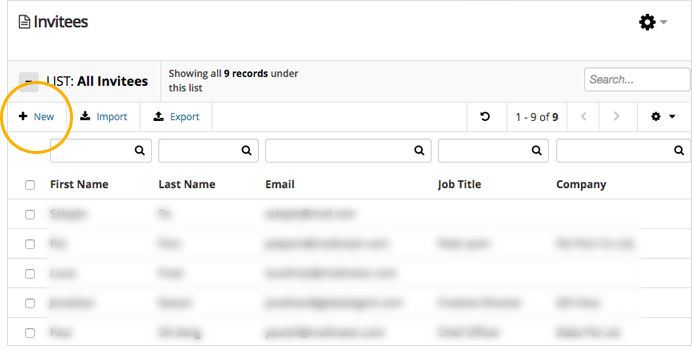
|
Save | Simply fill in the details of the Invitee and Save the record. This action will prompt the new record to show on the Invitee Grid. 
After saving your changes, you will be brought to the invitees grid, containing the newly created invitee(s). 
|
Attendees Grid
The Attendees Grid is where you can find all the attendees who have successfully registered for your event.
The Attendees Module
You can access the “Attendees” module by clicking on the left-hand navigation:

**Above image illustrates where to locate Attendees Module in the backend
This will open up the main Attendee screen which looks like this:

**Above image illustrates the backend view of the Attendees grid
Fields | Description |
List: All Attendees | The List Selector defines the records that show in the grid.
Clicking on the dropdown arrow will then allow you to switch to other lists and load the records under those lists. |
General Search Box
| The General Search Box allows you to search across all the columns of all your records: 
|
Action Bar | The grid's Action Bar contains the buttons representing the various possible actions on the grid, e.g. creating a new record, exporting the record, downloading e-tickets, emailing the record etc as shown here: 
|
Column Search Box | The Column Search Box allows you to search through a specific column only. Depending on the type of the data in the column being searched, the search options will be different, e.g. for a dropdown or checkbox type, the options in the search box will be like this: 
|
All Records Selector | Checking the All Records Selector checkbox will select all the records on the current page like so: 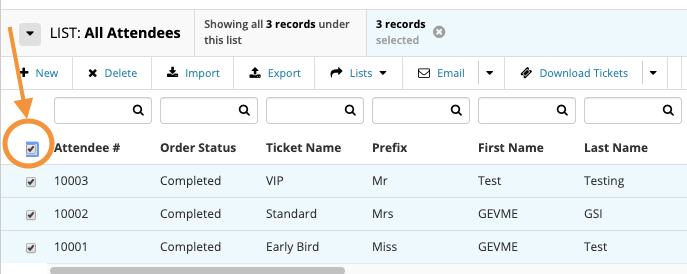
|
Individual Record Selector | Check the Individual Record Selector checkbox to select a single record. 
|
Search options on the Grid
There are 2 ways in which you can search for records in the grid:
General Search Throughout All Columns
Advanced Search on Specific Column(s)
Depending on the data of each column, you will be presented with different search options:
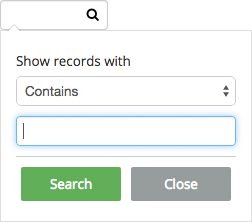
Text columns
If the column you are searching is of the text type, you will be presented with a dropdown which looks like the following:
**Above image illustrates searching a Text column on the Attendees Grid
Fields | Description |
Show records with | The options in the dropdown are: Contains
Search records that contain the keyword. Is equal to
Search records that match exactly the keyword. Does not contain
Search records that do not have any instance of the keyword. Is not empty
Search records where the value stored in the data column is not blank. Is empty
Search records where the value stored in the data column is blank.
|
Search / Close | Simply type your keyword(s) in the textbox and click on the Search button to search the column or Close the pop-up window |
Dropdown Lists / Radio Buttons / Checkboxes Field
For columns that provide users with options like Dropdown lists, Radio buttons and Checkboxes, the search pop-up will contain all the options that you inserted in the Attendee Form
e.g. 10:00 - 10:30, 14:00 - 14:30 and 16:00 - 16:30:

**Above image illustrates searching a Dropdown, Radio Buttons or Checkbox column on the Attendees Grid
Fields | Description |
Show records matching the following | Select all
Ticking it will select all the options below. Unticking it will unselect all the options. <blank>
Search records where the value stored in the data column is blank. <other>
Search records where the value stored in the data column is other than the options show.
|
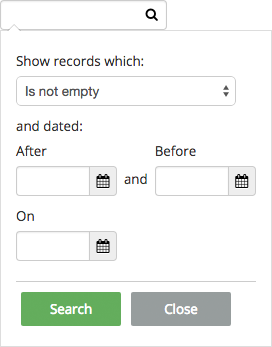
Date Field
Columns with data of the type date will show this pop-up when clicking on the search box:
**Above image illustrates searching a Date column on the Attendees Grid
Fields | Description |
And Dated: | After
Search records where the date in the data column is after the one specified Before
Search records where the date in the data column is before the one specified On
Search records where the date in the data column is on the one specified
|
Editing an Attendee's Information
The action of selecting an individual record on the Attendee Grid will open up the Attendee Sheet of that particular attendee.

**Above image illustrates selecting an individual record on the Attendees Grid
Clicking on the Edit button under the Submitted Data tab will allow you to make the required changes and save your action.

**Above image illustrates how to edit an Individual Record under the Submitted Data Tab
Fields | Description |
Audit History | This tab gives you a detailed audit history of a specific record e.g Updated the field Prefix from Mrs to Miss, Updated the field Select your desired Time Slot from 16:00 - 16:30 to 14:00 - 14:30. You can also easily track who is making the changes to the Attendees’ data. 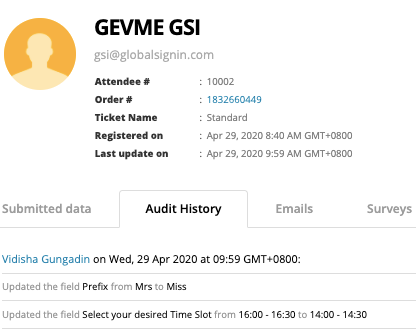
|
Emails | Under this tab, a list of emails will be displayed showing details like “Subject”, “Sent on”, “Sent by”, “Opens” and “Clicks”. This is particularly useful when you need to track which email has been sent to a specific record and find out the open and click rate of your email. |
Sending Email through the Composer
Selecting the record(s) will prompt the “Email” button to display as shown below:

**Above image illustrates Email button showing upon selection of record(s)
On the composer, you can load and use an existing template. You also have the option to Attach Files which can be individually or mass sent.

**Above image illustrates different the email settings
Fields | Description |
From | This is the name and email which will appear in the "From:" field when the recipient(s) receive your email. There are 2 options in the dropdown for the From value: (1) The first option is the name and email as set in the organizer profile. (2) The second option is the name and email of the logged-in GEVME user. |
To | These are the recipients of your email (the records which you selected in the grid previously). |
Subject: | The subject of your email. |
Cc & Bcc | Click Cc / Bcc to add carbon copy recipients of your email. |
Use a template | Click this to load and use an existing template. For example, if you want to send the confirmation email to the recipients, load the Order/Registration Confirmation template. 
|
Live merge preview | Click this to have a live preview of your email, with the actual content and text which will appear in your email, including personalisation tags. |
Attach Files | Click the Attach Files button to attach your own file to the email. Alternatively, click on the down arrow button to attach the respective recipient's Ticket or Calendar to the email. |
Send | When you are ready, click the green Send button to send out your email. |
Orders grid
Buyers and orders are critical aspects in the case of paid events. When a paid registration is submitted, an order is placed and the buyer is the person tagged to that order and the one who is therefore charged for the transaction. There are various scenarios that can happen during and after a paid event.
Access your Orders in the left hand navigation:
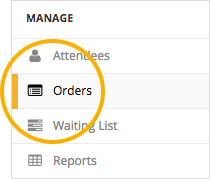
**Above image illustrates where to locate Orders Module in the backend
Receiving Offline Payment
You can search for an order by looking up the name or email address of the participant who sent you the offline payment.

**Above image illustrates the backend view of the Orders Grid
Fields | Description |
Order Details | Orders Details is where you can find all the information pertaining to a particular order. In this case, we are looking at manually changing a Pending Payment status to Completed Payment when payment has been well received offline.

|
Payment Status | In this e.g., Order payment status is pending, the total amount for the order is $200.00 and the outstanding amount is $200.00. 
|
Transaction | Click on the Transaction button in the toolbar, then on Receive Payment in the dropdown which appears: 
|
New Transaction

**Above image illustrates New Transaction pop-up
Fields | Description |
Date | This is the date on which the payment was received. |
Payment Method | This is the method used by the participant to send you the payment. The options are: Cheque Bank Transfer Cash At the Event Paypal Offline Credit Card Other Payment
|
Amount | Key in the amount received here. By default, the full amount will be entered in the box, but you can edit it accordingly. If you key in the full amount, the status of the order will be marked as Complete. If you key in an amount which is less than the outstanding amount, the status of the order will be marked as partial. |
Description | Add some information for your own record here (this is optional). For example, if the payment method is cheque, you could key in the cheque number here, or if payment was made through bank transfer, you could key in the transaction number. |
Printout Note | This option allows you to specify a note which will be shown on the transaction printout. This also is optional. |
Submit | To record and confirm the reception of the payment, click on the green Submit button. |
If full payment was received, a popup will appear asking if you would like to send a confirmation email to the ticket buyer and attendee(s):
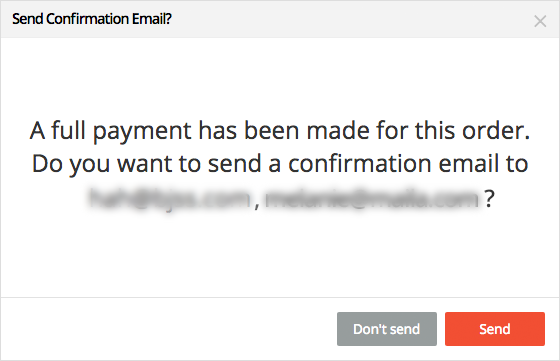
**Above image illustrates the Confirmation Email pop-up
Once the payment reception transaction is recorded, the Order Details screen will be updated accordingly:
The status of the order will be updated and marked as Completed (if full payment was received).
The transaction will be recorded under the Transactions tab, as shown above.
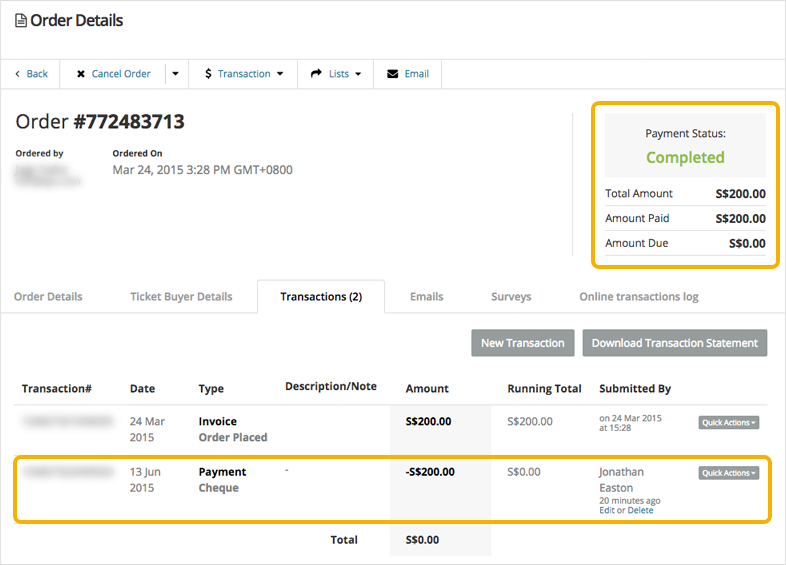
**Above image illustrates the Payment Status changed to Completed
Cancelling an Order
Sometimes an attendee cannot attend an event even though a full payment has been made. He/She might get in touch with the event organiser to cancel the payment.
Fields | Description |
Cancel Order | “Cancel Order” button can be found along the toolbar under Order Details of a specific order |
Confirmation cancellation of order | This will open up a prompt confirming whether or not you want to cancel the order. 
|
Do you want to issue a refund? | If there was payment made for this order, you will be prompted to issue a refund at this point 
|
Cancel Order (on the Orders Grid itself) | You can also cancel an order right from the orders grid by selecting the order in the grid and clicking on the Cancel Order button in the grid's toolbar: 
|
Payment Status | The order will be marked as cancelled and all the attendees under the order will be cancelled: 
The order will be moved to the Cancelled/Deleted Orders list under the Orders grid. It will therefore, still be accessible from that list. |
Refunding a Buyer
The action of refunding on GEVME is purely to record the transaction in the system, so bear in mind that it does not allow you to actually refund the money to the participant (that would have to be settled separately e.g. by sending them a cheque or sending them the money through bank transfer).
Fields | Description |
Transaction | “Transaction” button can be found along the toolbar under Order Details of a specific order and click on “Refund” 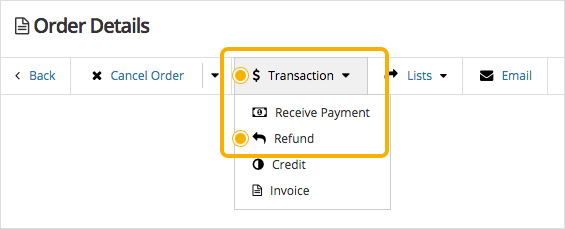
|
New Transaction | This will open up the New Transaction - Refund popup as shown below:
 |
Downloading an Invoice
Fields | Description |
Transaction | This tab is located under Orders Details. Below Information can be found: Transaction# Date Type Description/Note Amount Running total Submitted by

|
Quick Actions | Upon clicking “Download PDF”, an “Invoice” pdf will be automatically downloaded on your device 
|
Credit Adjustment in Order
A credit adjustment in an Order comes into play when there’s a need to adjust/reduce an Attendee’s invoice balance. All credit adjustment transactions always get recorded on GEVME for tracking purposes.
There are different ways on GEVME to go about refunding the additional credits back to an Attendee.
Fields | Description |
Additional Credits | This is usually used when the event organiser would like to give manual discounts on the specific order after the order has been submitted. |
Adjustments | This is usually used when there is a partial refund to the order total amount. |
Cancellation | This is usually used when an Order is cancelled and requires reconciliation on the order report to offset the order amount. |
Lists
Lists are another important aspect of data management in GEVME. Lists help you organize your invitees, attendees, contacts, etc. (effectively any data which is displayed in a grid) into categories, or segments.
Types of Lists
There are two types of lists that you can create on GEVME:
Static lists
Smart lists
Static List
Static Lists are segments where you can assign a record to this segment. This is similar to the concept of folders (segments) and files (record) but with an added bonus: you can assign a record to more than one static list.
Creating a Static List
The “Create a list” button allows you to create a list for the first time as shown below
e.g. VIP:

**Above image illustrates where to create a Static list
You simply need to click on the “+” button to keep creating and adding new Static Lists like so:
**Above image illustrates how to keep adding Static Lists
Assigning a Record(s) to a Static List
To assign one or more records to a static list:
Select the record(s) in the grid.
Click on the “Lists” button which appears in the action toolbar.

**Above image illustrates how to add record(s) to a specific Static List
Smart List
Smart Lists are filters, or searches, used to create a list or segment. Smart lists therefore, are updated real-time upon the contact/attendee/orders fulfilling the search criteria. In that sense, smart lists can be considered as being "saved searches" which, at any point in time, consists of the records which match the criteria of the search.
Creating a Smart List
To create a Smart List, simply start by doing a search. For example, to create a smart list of Attendees who bought a ticket called "Early Bird":
Search the Ticket column for "Early Bird".
Once the search is performed, click on the Save search as smart list at the top of the grid.
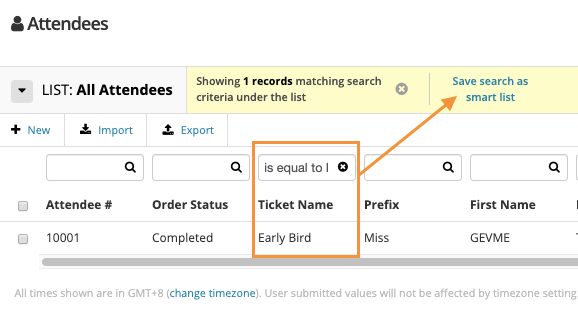
**Above image illustrates how to create a Smart List based on a criteria of search
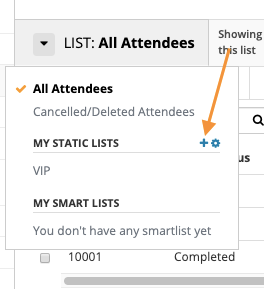
Accessing your Lists
To access your smart lists, click on the list selector dropdown in the top left hand corner of the grid you are currently managing, then click on the smart list which you want to load in the grid.
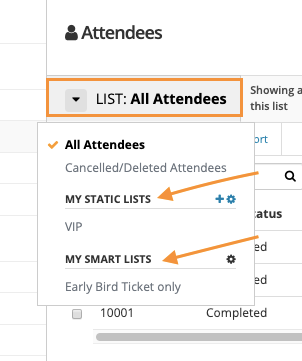
**Above image illustrates where to locate your lists (both Static & Smart)
Email Campaign
In GEVME, an email campaign is a blast of email(s) that you send to one or more recipients. Each blast that you send is considered a campaign.
Sending emails through Campaigns is one way of sending emails in GEVME. The other way being through the Composer. Each way has its own specific purpose and is suitable for different cases.
Sending emails through Campaigns is especially suitable for cases where you want to send a "heavy" email to a lot of recipients or to multiple lists of recipients.
Creating a Campaign
Click on Campaigns in the left navigation:

**Above image illustrates where to locate Campaigns on the left hand side navigation
On the Campaigns screen, click on the Create new campaign button in the top right hand corner of your screen:
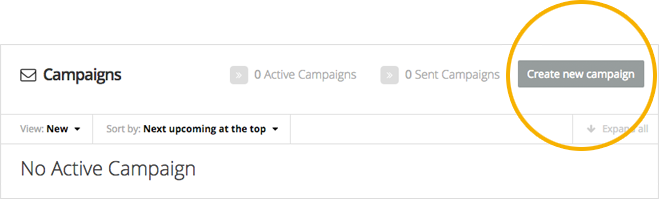
**Above image illustrates how to create a new campaign
Setting up a Campaign
Once you create a campaign, you will be presented with the Campaign Creator sections i.e Email Builder, Campaign Settings, Attachments, Send/Schedule Settings
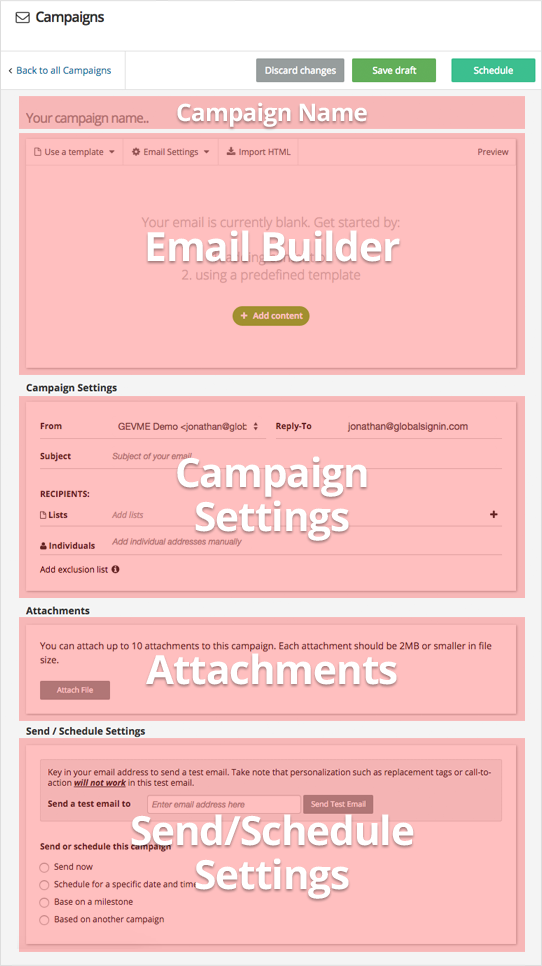
**Above image illustrates the full flow of setting up a new campaign
Email Builder
This portion is where you actually build the content of your email. In here, you have the following options:
Fields | Description |
Campaigns | Enter a name for your campaign where the placeholder text "Your campaign name..." appears. 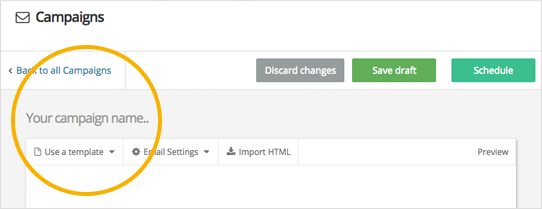
The campaign name is only used internally and is not displayed to the recipients of the email.
Note: The campaign name is the minimum information that you need to fill in order to be able to save a draft of your campaign. |
Use a template | Click the Use a template tab if you want to load an existing template or campaign.

|
Email settings | Click the Email Settings tab to customize visual elements of your email, e.g. the email background colour, content background colour, content border style, etc.

|
Import HTML | Click this to import your own HTML code and load it in the email builder. |
Add content | Click on the green Add content button to build your email from scratch by using the GEVME email widgets. The GEVME email widgets appear when you click on Add content and are shown below. 
|
Campaign Settings
These are the different options under Campaign Settings

**Above image illustrates the email settings of the campaign
Fields | Description |
Lists | This is the list(s) to which the campaign will be sent. Click on Add lists to select one or more lists. |
Individuals
| If you want to send the campaign to individual email addresses as well, enter them here. Note, however, that personalisation will not work for individual email addresses entered here. |
Exclusion | If you want to exclude some recipients, choose the corresponding list which contains them here. For example, if you choose List A as your recipient list and List A contains Joe, Peter and Sally, and you choose List B as the exclusion list, and List B contains Sally and Jen, then Sally will be excluded from the recipients and will not receive the email (Jen also of course will not receive the email, as she is not on the recipient list). |
Sending/Scheduling a Campaign
Fields | Description |
Send now | Choose Send now as the option under Send/Schedule Settings 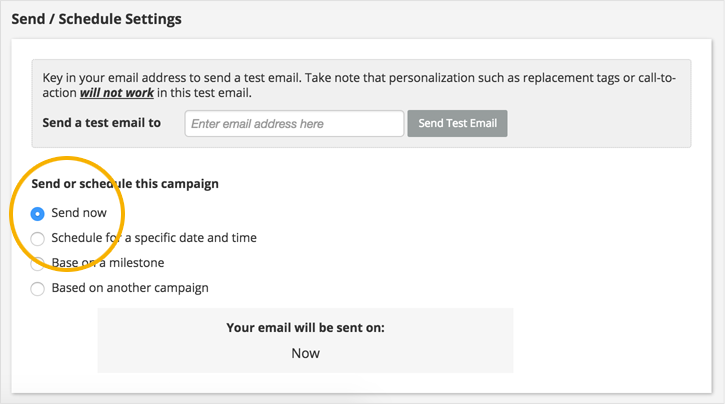
|
Schedule for a specific date and time | This setting allows you to choose the exact date and time on which you want your campaign to be sent out. To schedule your campaign to be sent on a specific date and time: Choose Schedule for a specific date and time as the option under Send/Schedule Settings. |
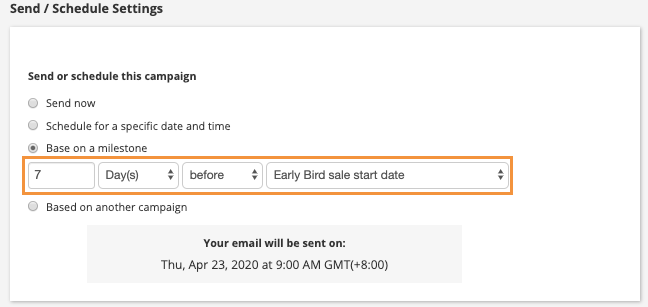
Based on a milestone | This is a bit of a smarter setting and will send your campaign based on the following key milestones: Your event start date. Your event end date. The sale start date of any of your tickets.
For example you could schedule your campaign to be sent 1 week before your ticket Early Bird starts selling.
To schedule your campaign to be sent based on a milestone: Choose Based on a milestone as the option under Send/Schedule Settings. Configure the parameters accordingly. For example, to schedule your campaign to be sent 1 week before your ticket Early Bird starts selling, the settings would be as follows:
|
Based on another campaign | This setting is similar to the "Based on a milestone" setting above, except that in this case, the milestone is the sending of another campaign.
For example, you could schedule one of your campaigns called "Invitation Blast 2" to be sent one week after another of your campaign called "Invitation Blast 1" campaign. |
Extra actions
The icons on the right allow you to perform the following actions on the scheduled campaign:
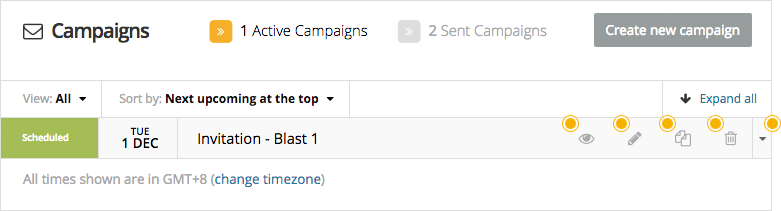
**Above image illustrates extra actions that can be performed on the campaign
Fields | Description |
View | Clicking this will open up the campaign in a popup for you to view it. |
Edit | Clicking this will open the campaign in the campaign creator screen, with all the campaign settings etc. However, please note that because the campaign is already scheduled to be sent, you won't be able to edit its details and information. |
Duplicate | Clicking this will duplicate the scheduled campaign. The duplicated campaign created will be in draft mode. |
Delete | Clicking this will delete the scheduled campaign. |
More info arrow | Click the More info arrow to show more details about the campaign, like the recipient list(s) and the exact date and time on which the campaign is scheduled to be sent. |
Download the PDF file of the guide: