To customize your event page, click on Event Page in the left-hand navigation menu:

This will open the Event Page settings page: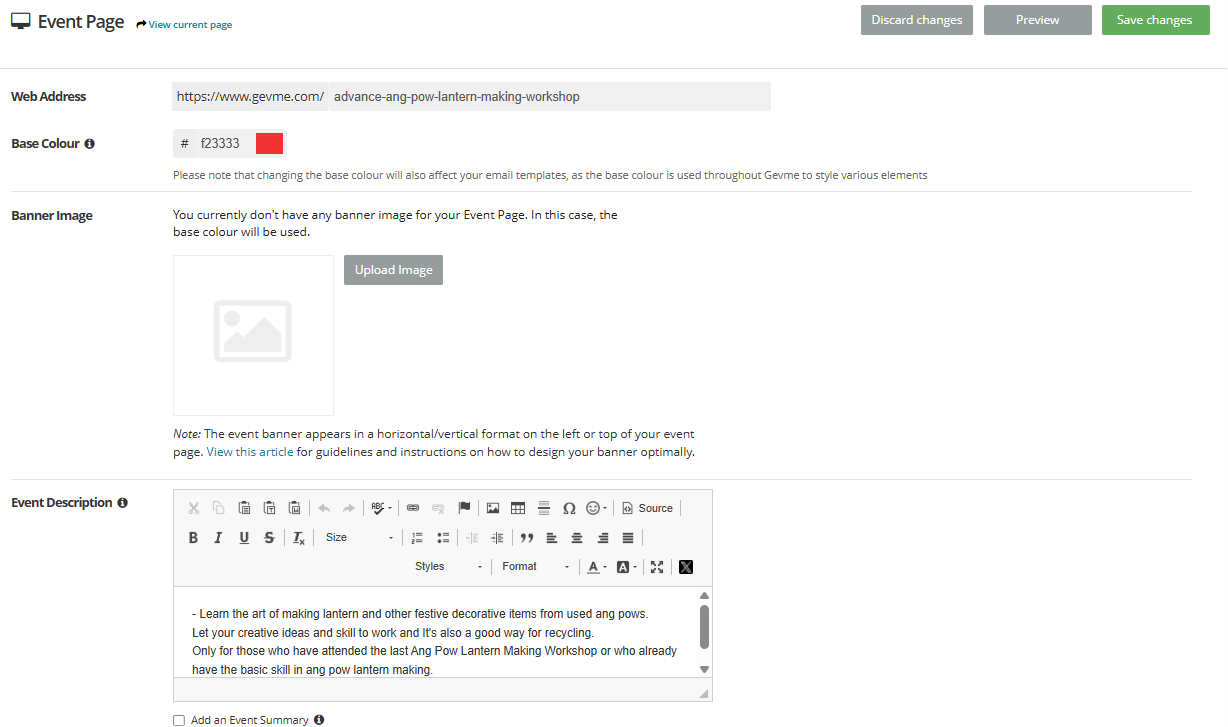
The following are the options and customizable settings for the Event Page:
Web Address
This is the URL of your event page.
Note: Event web addresses are unique in GEVME. That means that no two events can have the same web address.
Base Colour
The Base Colour is used across various items related to your event, e.g. the event title on your Event Page, the title on your eDM's, your links etc. It can be considered as your event's brand colour. Ideally, this would be set to your official brand colour or to a colour which matches your brand colour.
Banner Image
The banner image appears on the left of your Event Page. For more details on the banner image, see the articles The Event Page Layout and Event Banner Dimensions and Guidelines.
Event Description
The Event Description appears on your Event Page. The content that you insert in the Event Description can be formatted just like in a word processor and can contain the following:
- Formatted text
- Images (width 550px max)
- Tables (width 550px max)
- Hyperlinks
- Express Your Events with Emojis
Open Graph Settings
The Open Graph Settings section allows organisers to customize how their registration landing page appears when shared on social media and messaging platforms such as Facebook, LinkedIn, X, and WhatsApp.
By default, the Open Graph Title, Description, and Image are populated from the event's title, description, and banner. With this feature, organisers can override these values directly from the Event Page settings, providing greater control over social sharing previews without requiring engineering assistance.
For the best display across platforms, it is recommended to keep titles and descriptions concise and use an image sized 1200 × 630 px.
Note: Open Graph settings will show "except" when Privacy is set to Private with any of:
- Invitation only
- Password protected

Shown On Landing Page
The settings for this option affects what shows in the Floating Block on the Event Page:

- Event Venue Map
Check this box to show the Event Venue link in the floating block. - Link to Event Website
Check this box to show the Event Website link in the floating block. - Social Links
Check this box to show the various social links in the floating block. - Show Event Logo
Check this box to show the Event Logo in the floating block.
Google Analytics
Enter your UA Number and Domain here to keep track of the analytics on your Event Pages.
Google Tag Manager
Enter your GTM Number here to add custom script on your Event Pages.
Privacy
There is option for Attendees to share the Event with their friends on Facebook, Twitter and LinkedIn. When this option is enabled, the Share on Social media section is visible on the Event page.
There are 2 settings for the privacy of your event:
- Public
Setting up your event as Public means that your event page (and hence the registration to your event) will be public and open to everyone. - Private
Setting up your event as Private means that your event page (and hence the registration to your event) will be only accessible to selected people.
There are 2 options for having a private event:
(1) Invitation-only
This means that your invitees must receive an email invitation with a unique registration link in order to register for your event.
(2) Password Protected
This means that your event page (and hence your registration) will be protected by a password and that people will only be able to access it by inserting the password.
Contact the organizer email (in the footer)
This is the email address which receives the message when participant clicks on the "Contact the organizer" link in the footer on your event page.

Registration "Back to Event..." link
'Back to Event...' is shown on the Confirmation page after registration submission.
This is also the page shown when:
- Registrant clicks Cancel on the Registration Form
- Registration form expires (when countdown timer reaches 0)
There are 2 settings:
- URL for 'Back to Event'
By default, its left blank for Event landing page.
A different URL can be set instead of the default Event landing page.
Note: This setting can be dynamically overwritten using ?return_url while loading the Event landing page. - Hide 'Back to Event...' link on the Confirmation page after registration submission